Fashion Photography
Fashion photography is a genre of photography dedicated to show clothing and other fashion items. Fashion photography is usually for advertisements or fashion magazines such as Vogue, Vanity Fair, or Elle.
Fashion photography involves taking pictures of models wearing the latest clothes, accessories, hairstyles and make-up. Pictures may also be of fashion accessories. The photographs are used in a all sorts of media, including books, reports, advertisements and catalogues. This kind of photography is taken in studios, and sometimes outdoors.
Some Photographers in the Fashion Industry that I like quite well are Bruce Weber, Alexi Lubomirski and Craig McDean.
These Photographers mostly advertise for fashion magazines. For example, Vogue.
Photographers of Vogue (covers)
Vogue is a globally recognised fashion and lifestyle magazine that is published monthly in 23 different national and regional editions by Condé Nast.
The Fashion Photographers that I have chosen all have taken photographs for 'VOGUE'. The three of them have different unique's to their photos. For example, Craig McDean, his photographs come across more 'retro', 'vintage' and different in most of his work.
.jpg) |
| Alexi Lubomirski |
 |
| Bruce Weber |
 |
| Craig McDean |
Light Painting
Light photography is the one of the most interesting, fun photography that you could do.
Light painting is a photograph technique in which exposures are made by moving a hand-held light source or by moving the camera.
The Artist who is taking the image will open the shutter of the camera for an extended time.
To do light painting, you'll need 'shutter speed' as it sets how long time the light (image reflected) will be entering the lens and projecting onto the sensor.
You'll need a dark set to do light photography as to avoid light from getting in the way of your shot. It'll be easier and better to do photographing at night or blocking all the light around you.
Also, you will need the right bulb settings. For example, Bulb (“B” setting on camera) lets your camera to keep the shutter open endlessly. When the shutter release button is pressed, the shutter opens and stays open until the shutter release button is pressed again.
Here are some examples of 'light painting'

In photography, bokeh is the creative quality of the blur made in the out-of-focus parts of an image formed by a lens. “Bokeh” is a Japanese word, which means blur or aesthetic beauty of blur.
Bokeh is one of the most popular subjects in Photography. The reason on why it is so popular is because Bokeh makes photographs visually appealing, making you focus on one spot in particular of the image.
Here are some examples of 'Brokeh'

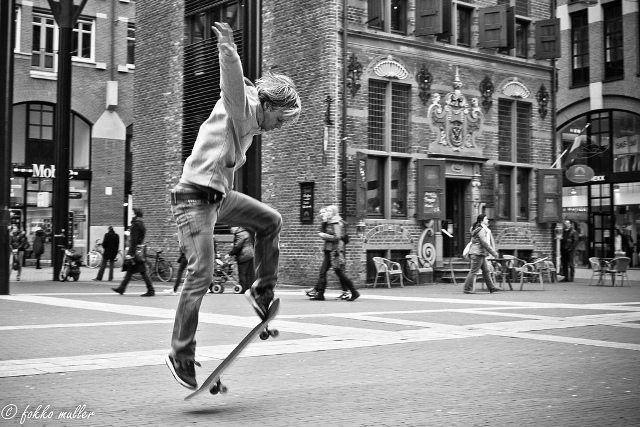
Street photography is capturing people and places. For example, street photography can be defined as un-posed, un-staged photography. Street photography usually captures, explores and questions society and the relationship between one another and their surroundings.
All street photography doesn't need to involve people, although most of the time it does.
Street photography is when something you have captured is unplanned with a lack of 'pior arrangement'. Pre-planned public events don't have the same feeling as the un-planned being captured as it comes across more real to street photography and it's genre.
Here are some examples of 'street photohgraphy'


 under-exposed or over-exposed. I used 800


.jpg)
.jpg)


 This is my first option.


.jpg&container=blogger&gadget=a&rewriteMime=image%2F*)


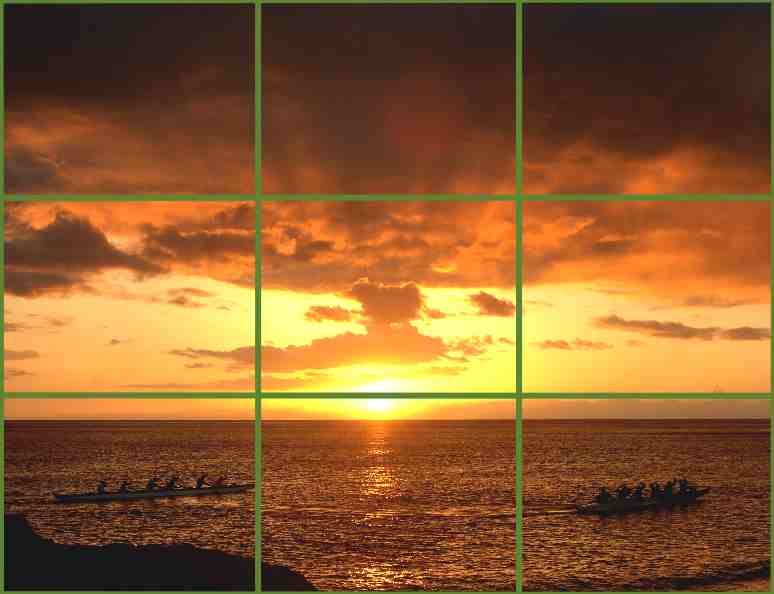 This image shows the 'rule of thirds' as it is split down into thirds.
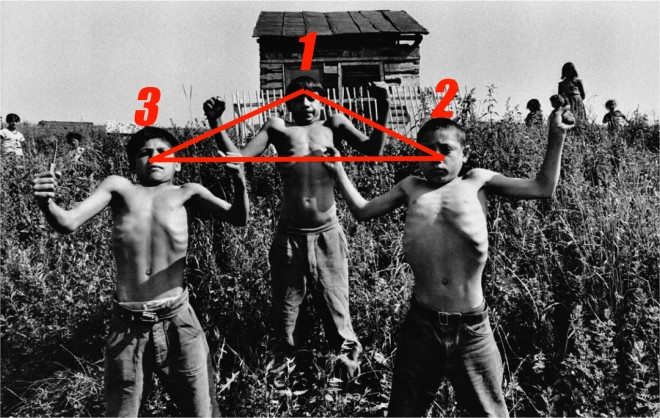
 The Rule of Even and Odd is a way of composing a picture, where you use either even or odd numbers to make different effects. For example, if you have three people in a picture, the attention goes to the one in the middle. If you have 6, the attention may be more scattered between all the people.
.jpg)


.jpg)